Going solar is one of the best decisions you can make on many levels. Besides doing your bit in the fight against climate change, it can help you save money and gain energy independence. In this process, you can also help the country achieve its clean energy goals.
Before going solar shopping, you need to understand your energy usage, availability of sunshine, and the right solar equipment for your needs. And how to install the solar panels, set up the system, and get it running.
This knowledge may come in handy to install smaller solar systems on your own, though bigger projects do need professional help. Even when you hire an installer to do the work for you, this know-how will be useful to monitor the work and to ensure that safety measures are in place.
Here is a step-by-step guide to solar panel installation.
Things to Know Before Install Solar Panels
Finding the right solar equipment requires information gathering about the power requirement, sunlight hours in your location, and suitability of your home for solar panel installation. These inputs are necessary to decide the capacity and size of the solar panels.
Let us get started.
What is the power demand you want to meet with the installation?
You need to have a good idea about the energy output expected from the solar panel installation before going solar shopping. Are you planning to meet the energy usage of your home fully or partially? If partially, by how much?
The higher the energy output of solar equipment, the more expensive it is. This means it would help minimize the cost of the equipment by lowering your energy usage. This can be done by raising the energy efficiency of the electrical fittings and appliances.
Your home energy usage can be easily understood by going through the past electricity bills. Find an average of the bill amounts for the last 6 months or one year and there you have your energy usage data ready!
How many hours of direct sunlight are available in your location?
The efficiency of the solar panel installation is directly linked to the hours of direct sunlight available. Though solar panels generate electricity even on indirect sunlight, it would be below its maximum capacity.
The rule of thumb is simple – more direct sunlight means fewer panels.
Identify the best spots to install solar panels
The design and layout of your home, especially the rooftop is an important factor as well. You need to find out whether it is possible to mount the solar panels at the right angle to get maximum exposure to sunlight.
And how many panels can your rooftop accommodate? Is your yard suitable for installing solar panels?
Find out the answers to these questions to find the right solar equipment for your home.
Installing solar panels in 6 steps
Once you have conducted the basic assessments as detailed above, it is a simple task to install the solar panels and set up the system. Follow these steps for easy installation.
Step 1: Identify the most suitable spot
As you have already done a survey of your property and identified potential spots for installing the solar panels, this step would be a repeat of that. However, it is necessary to see whether the solar equipment you purchased would fit into the earmarked spot.
The direction and angle of the roof are important factors that will help in getting maximum exposure to sunlight. Figure out the placement of the solar panels after considering all these factors.
Step 2: Fix the mounts
The mounting system may be built using iron or aluminum rails. Depending on the number of solar panels to be installed, work out the design for the mounting system.
When fixing the mounting system, ensure that there is space for running conduits from the solar panels to the home electric system. The conduits are necessary for connecting the solar panels with the rest of the components.
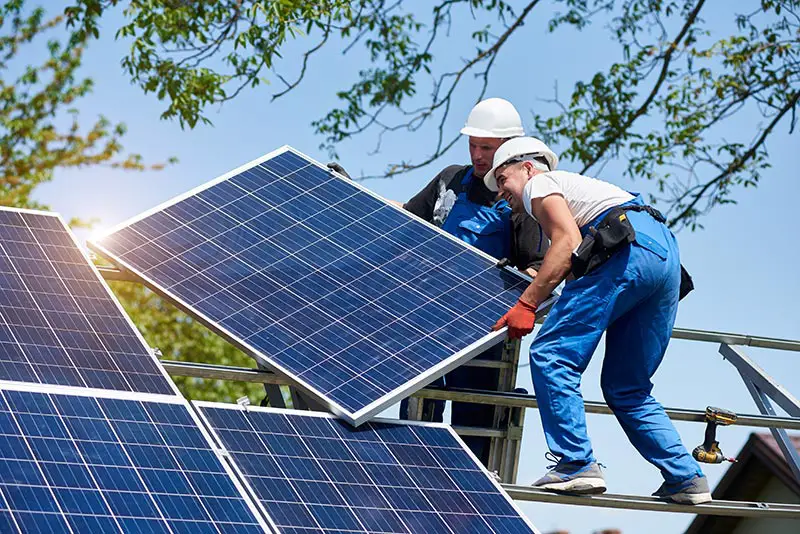
Step 3: Mount the solar panels
Solar panels are mounted on the framework using bolts, clamps, or brackets. Ensure that the panels are firmly fixed to the mounting system. It should be strong enough to withstand the vagaries of the weather year-round.
When installing the solar panels by yourself, take care to avoid mishaps or damaging the panels.
Step 4: Do the wiring
This is the most difficult and time-consuming of all the steps. It requires basic knowledge about electrical wiring and lots of patience and perseverance. If you are unsure about this step, it is better to seek the help of a qualified electrician. Take care to avoid self-injury and damage to the system.
Each solar panel comes fitted with wiring that connects up the solar cells arranged in them. The wires from all the solar panels need to be connected up using a fuse combiner box or junction connectors. Ensure that the wiring and the connections are well insulated to withstand wet weather conditions and power leakage.
Step 5: Connect the panels to the rest of the parts
Once all the solar panels are wired together, this needs to be connected to the rest of the components of the solar equipment kept inside the home. These include an inverter, charge controller, disconnect switch, and solar battery, in case using it for storing excess energy generated.
This will complete the wiring for the solar power system.
Now, it needs to be connected to the main electrical switchboard to allow the solar energy generated to reach all electrical fittings, appliances, and devices at home.
If using a net-metering arrangement to export excess power generated to the main grid, you need to change the electricity meter to a bi-directional one. This will keep tabs on the amount of inflow and outflow of electricity from your home.
Step 6: Ground the panels
Both panels and mounting systems need to be grounded as a safety measure to avoid electric shock from accidental power leakage. Grounding helps in:
- Protecting you from electric shock
- Protects the appliances from electric surges
- Stabilizes voltage levels
Grounding is a necessary precaution against electrical accidents. A power surge may happen when lightning strikes the system or when the system short circuits. This will result in dangerously high voltage of electricity passing through the system, resulting in damage to everything connected to the system. In the worst-case scenario, this can even result in fire.
Grounding or earthing the system is accomplished by connecting them to grounding rods buried deep in the earth.
The home electrical system should also be grounded if not already done.
Now that all the components of the solar equipment are in place and connected up, it is time to do a dry run.
How to conduct a dry run?
Before testing the solar system, all installations, wiring, and connections should be rechecked to ensure everything is in order and securely in place. The dry run is done to guarantee the safe and proper functioning of the system.
Once you complete the test run successfully, it is time to sit back and enjoy the fruits of your labor. If you find any glitch in the system during the test run, go back and recheck everything you have done. In the rare case that you are unable to resolve the problem, seek professional help.
Frequently asked Questions
Here are a few commonly asked questions answered for you.
The cost of installing a 10-kW residential solar power system is approximately $20,000 after federal solar tax credit. The cost of solar energy per watt will come to around $2.81.
For an average-sized home, a 10-kW solar system is considered the right size. In case your energy demand is more or less than 10-kW, the size of the solar power system differs and so does its cost. The bigger the system, the higher the cost.
Installing a residential solar power system involves a lot of work both indoors and outdoors. And it demands basic knowledge about electrical wiring and the skill to fix the mounting system. The work can be overwhelming for many though it is not impossible to accomplish.
There are solar systems available in the market specifically designed for those who want to install them themselves. These DIY solar systems are smaller in size with low energy output. You may choose a DIY system if it suits your purpose and needs.
Cost-effectiveness is one of the main advantages of DIY solar systems. These systems come with detailed how-to guides to help enterprising homeowners.
The answer to the question depends on many factors - your energy demand, the technology used in the manufacture of solar panels, and the availability of direct sunlight.
On average, a 10-kW solar power system will be able to meet the energy demand of a household. Assuming that you are choosing 250-watt solar panels, the estimated number of solar panels required would be 40.
As your energy demand varies, the capacity of the solar panel installation varies and so does the number of solar panels required.
The average lifespan of a solar installation is 20-25 years. If you are expecting repairs or replacement of your roof soon, it is better to do it before installing the solar power system. Removing and reinstalling the solar power system can be a costly exercise.
If you are getting professional help for solar installation, the installer will be able to assess this requirement and offer you a suggestion. If you are self-installing the system, it is your call to take.
With the array of solar incentives like the federal solar tax credit and rebate offered for installing a residential solar system, the cost of installation has come down drastically in the last decade. The savings in the electricity bills are dependent on the energy rates in your location. If the difference is substantial, installing a solar energy system can be deemed to be worth the effort and expenditure.
Bottom Line
Solar power is considered the future in the energy sector as it provides clean energy coupled with freedom from the grid. If you are concerned about its cost, you can save money by opting for a smaller solar system that can be installed by yourself. As the saying goes, something is better than nothing.
However, if you want to power your home solely with solar energy, you will need a solar system with a higher capacity. It is better to trust professionals to do the job for you. Even in this case, having the know-how of solar installation doesn’t hurt.
Recommended Reading:
- Common Problems with Solar Panels on Roofs
- How does Solar Energy Produce Electricity Step by Step?
- How to Get Rid of Pigeons Under Solar Panels?
- Solar Panel Maintenance Checklist
- Pros and Cons of Buying a House With Solar Panels
- How To Increase Efficiency Of Solar Panels?
- 6 Main Solar Panel Components